I received my new thermostat fitting from Teal Jenkins (SkyTrax). It adds a port for a temp sender. An easy swap out.

The old housing

The new housing showing the port


I received my new thermostat fitting from Teal Jenkins (SkyTrax). It adds a port for a temp sender. An easy swap out.
The old housing
The new housing showing the port
I started installing the oil cooler parts today. First up was the sandwich plate that fits under the oil filter. This provides an inlet/outlet for the oil to/from the cooler. Thomas (Edge Performance) designed and produced the part and it is beautiful. Fits perfect except for one issue, there is a casting tab on the block that interferes with one of the ports. So, it has to be removed. It is a chunk of aluminum and I had to think about the best way to remove it. I decided to drill a small hole as near the center as I could free hand. I actually got it pretty close and then just step drilled using successive bits until I removed as much material as I could. Then I broke out the files and went to work, after several hours and test fitting, I got it done.


I began mocking up the brackets for the Intercooler today. I used foam board for the construction and hot melt glue to hold it all together. Steve Henry was very nice and sent me some drawings of how he did it. Starting with those, I was able to freestyle a bracket of my own. Here are the brackets taped in place.
The flat rectangular front piece is a place holder representing the back of the Intercooler and will not be a part of the finished product. It also holds the brackets to the proper width to frame the gearbox. So, there are two brackets, a right and left side. The brackets will attach at the engine mount bolts on either side where you see the duct tape. The hole you see in the side of the bracket is a cutout for the tube exiting the Intercooler.


This pic shows that the brackets will hold the Intercooler square to the engine, in this case the front of the black gearbox. It also shows there is plenty of space between the gearbox and the rear of the Intercooler. The face of the Intercooler will sit just behind the prop spinner and a little lower, filling the gap as seen in this pic.
The plan is to add an oil cooler in front of the radiator. So, while looking at some pics of others installations of the radiator/oil cooler and noticed my radiator was hanging lower. So I decided to flip my bracket which required some modifications, and raised it up to match the others installations. I trimmed the bracket depth which moved the outputs closer to the firewall. I also discovered the outlets were 1.25" rather than 1" so I am having new outlets welded on. This gives me the chance to re-clock the outlets to better line up with the actual hose positions.

The old position

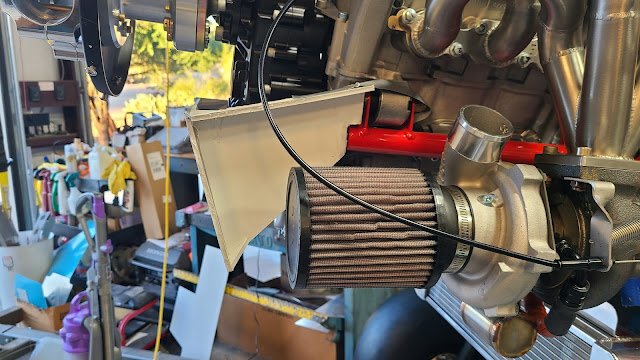
The new position. Besides some of the coolant hoses, you can see the temporary installation of the exhaust tube coming out of the back of the turbo housing. I still have quite a bit of work to do on the exhaust system.


This 90 degree radiator tube will be re-clocked up to not quite vertical to mate with the hose.

This tube will also be re-clocked a few degrees towards the middle, again to mate up better with the hose.

Well, two steps forward, one backward. Decided to install the floorboards to check fit and see how it looks. Unfortunately, the last time I had the floorboards installed was before fabric. The fabric shrinking process changed the dimensions a bit, just enough that several screws no longer line up. A bit of trimming will be needed on the back board and the opening around the left fuel drain fitting. It does look pretty good but we'll see after trimming and re-drilling.

The heat shrink came in this afternoon so I was able to finish up the fuel lines on the engine and get them installed.
The high pressure supply line is connected to a quick disconnect fitting on the rail.

Looks kinked but the inner fuel hose is not. There is a fuel injection hose clamp on the low pressure return line on the rail.

Firewall bulkhead connections.
I received the exhaust manifold back yesterday and reinstalled it this morning. Beautiful job.


It's a small detail but I came up with an idea of how to incorporate the Just Aircraft Logo into my build. I put it inside the star on the tail, the star had to be a little bigger but I think it came out pretty nice.

After removing the old star, right side

Left Side

New star in place right side.
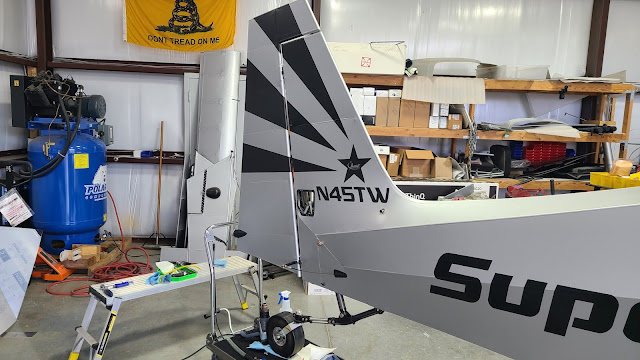

Close up.
Then I placed the Fuel Drain labels on either side.

After a long hiatus for various reasons, I'm back to work on the plane. A final push to get it completed is underway. Over the past week I accomplished several things.
I began completing the fuel system today. I needed to make up several new hoses for the header tanks and complete the fuel drain system. I tightened up the bulkhead fittings for the fuel drain then installed the exterior drain plugs then the interior AN-6 to NPT nipples.


First, I made up the short supply lines and then the fuel drain lines.


Next was to make a new 180 degree hard line to run from the fuel filter to the fuel filter. I needed a new one because I added a small check valve in between them. This is to stop the fuel from flowing backwards should a pump fail or just be turned off. It was a tight fit with close tolerances and took several attempts to get it right.


Good clearance from the fabric sides and from the wiring.

Then on to the wings. I had to plug the front fuel ports as I am not going to use then initially. Most builders do not because of the added complexity to the fuel system. I did however want to have the correct fittings installed in the event I ever choose to use the ports. So, I installed the finger strainers and then the correct AN-6 to NPT fitting for my system. Then put a cap on it to seal it. Should I ever choose to use the port I just need to take the cap off and add the fuel line.

After completing this on both wings I moved on to installing the fuel gauges and fittings for the rear ports that I will be using.

Right rear port and brass fitting for the fuel gauge.

Right upper fuel gauge fitting. The open port is for a vent line I've yet to make or install.

Looking at the left wing fuel gauge temp installed.

Here it is with the wing folded back. No clamps on it yet. Was just getting the fitting correct. There is a copper wire heavy gauge inside to give it some rigidity and to stop the sloshing effect, this will give a better reading.

Here you can see clearly the wire inside. Waiting for the clamp to arrive to finish this up.
Last but not least, I tightened up the return fitting for the header tanks. The capped off fitting is for the future use of the front ports in the fuel tanks.


The forward facing fitting that is unused is for the vent line yet to be installed.