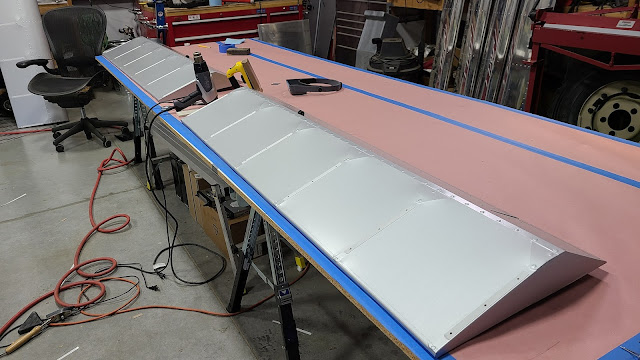
I started covering the flaps today. I decided to cover the flaps and ailerons in two pieces each, a top and a bottom. Of course, the "other" way is to do it in one piece. To me it is easier to do it in pieces, the down side is an extra seam at the leading edge. To help hide the extra seam, I will do the top of the flap and aileron for that matter, first. This puts the seam on the top which will be hidden by the wing when they are installed. I had previously sprayed both the flaps and ailerons with primer which is required to give the Oratex glue something to bond to.
First thing is to cut the fabric to size, one for each side. Then lay the flap on the fabric and mark the outline of the flap on to the fabric which becomes the glue lines. A light scuff on the flaps and a wipe down with Acetone to clean any debris off. Then two coats of glue on both the fabric and the flaps.
Lay the fabric in place and start tacking with the heat gun.
I came up with a technique to deal with the rivets. I used the butt end of a wooden foam brush handle to push down the fabric around the rivet head. First, heat the area around the rivet with the gun, then use the wooden dowel to roll around the edge of the rivet until it cools enough to hold.
It gives a nice heat shrunk look rather than the unsightly puckered
look. Really adds a lot of detail. However, it is a very time consuming
task as every rivet has to be done. Worth the effort I think.
This side all complete. I'll wait until I finish both sides before I put a final shrink on it so I don't warp the flap.
Time to do the bottom.
Same process; layout, glue, stick...
Left Flap...
Left bottom.
Reinforcing tapes. There are some different schools of thought regarding these tapes with Oratex. Some use them, some don't. Some just use the fabric rivets, some don't. I chose to use the tapes with the fabric rivets.
The tapes are a polyester self adhesive tape, you cut to length, peel and stick. Once they were down, I used a portable soldering iron to burn holes where the rivets will go. These holes have to be drilled out prior to fabric installation.
Rivets in place...
Once all the holes are burned through the fabric tapes, I used a razor blade to carefully slice the crusted burn material from around the holes. A nice light touch will yield a "doughnut" of burn material leaving a nice smooth hole for the rivet..
Once all the rivets are in place it's time for finishing tapes. They are short strips of Oratex self adhesive finishing tape cut to length. They are shrunk over the reinforcing tape and rivets.
If I had to do it over again, I don't think I would have used the reinforcing tape. Oratex is so strong compared to Polyfiber that I think the tape isn't needed. The tape is a hold over from the traditional Polyfiber covering method. In the end, the look would be much cleaner without the tape, and the fabric rivets give the additional mechanical fastening needed anyway. Additionally, since the Oratex is glued to the ribs, I don't see any additional benefit added by the tapes. Just my .02 on the matter.
The last thing to do is add the sea-plane grommets to the trailing edge, one per bay on the side toward the fuselage. This allows any water that makes its way into the flap to exit. A hole is burned through the fabric at each location and then a sea-plane grommet is super glued in place over it. I didn't snap a pic of this on the flaps but will do on the ailerons.


