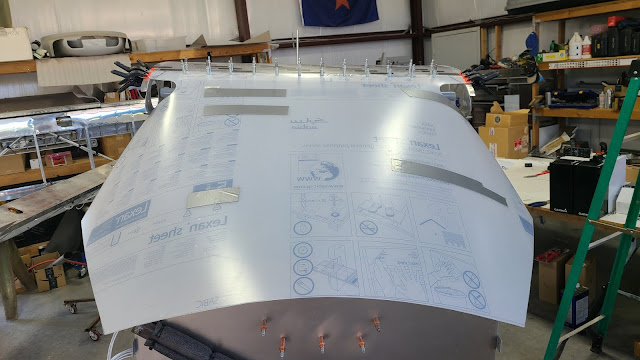
Over the past week I've been installing the Extreme Windshield. The first task which was accomplished previously, was to fabricate the Windshield/Skylight bracket and install the Skylight. It is necessary to have the Skylight installed (at least the forward edge cleco'd in place with the rest clamped) to help stabilize the bracket and to set the spacing of the windshield.
To begin the windshield installation I had to trim the aluminum side pieces to fit the fuselage and cleco them in place. The trimming was to clear welds on the fuselage, the length of the pieces was fine.
The next task was to use the provided template to cut the top of the firewall to shape. I decided to make a temporary Lexan firewall using my Titanium
firewall as the template. This allowed me to "see" what was happening
while making adjustments. It also would be less expensive to screw up,
just in case.
Once I had the shape cut I set about fitting the inner boot cowl to the firewall. This inner boot cowl accomplishes a couple of things. First, it gives a surface for the front of the windshield to attach to. Second, it provides quite a bit of strength to the upper firewall.
Originally, the Extreme Windshield was designed for the Highlander and the mold for the fiberglass inner boot cowl was made for it. When someone decided to mount this on the SuperSTOL they realized that because the SuperSTOL has a thicker wing, the angle of the front of the windshield was different and the fiberglass part needed to be rotated up to the new angle required. This means that the top of the SuperSTOL firewall would have to be bent out a few degrees to the new correct angle. It just takes some extra fitting/tweaking to make this work but once done the installation is the same.
As you can see from the pics, the fiberglass part is larger to allow for trimming. So, the object is to get the fiberglass part to be just about even with the Lexan shape. I got it close but realized the Lexan firewall was not allowing me to finish because of the required bend in the firewall. I decided to transfer the arc to the titanium firewall, re-install it and go from there.
After cutting the Titanium to match the curve, I measured and put the required bend in the Titanium then re-installed it on the fuselage. This is not a one time thing. It is a "get close" and try again proposition. The object it to have the windshield make contact with the entire top surface of the fiberglass part when installed. This is complicated by the fact that until you cut the windshield you can't know if it will make full contact. So, get it close and adjust if needed.
Here is a pic showing the bend in the Titanium and the fiberglass part fitted to the Titanium. As you can see the shapes are a little different. First, the Titanium sticks up a bit over the fiberglass, this is so the windshield will be flush with the Titanium (it allows for the 1/8th inch thickness of the windshield). Second after everything is fitted, I will mark and remove the excess Titanium, sanding to the exact shape of the finished windshield.
The next phase was to lay the provided windshield template out on the Lexan and cut it out. Once I had the Lexan cut, I clamped it in place on the fuselage and squared it up with the leading edge of the skylight, leaving a 1/8th inch gap for expansion. When I was happy with the fit and position, I clamped it in place so I wouldn't move. I then drilled and installed cleco's all across the trailing edge of the windshield. This sets the position of the windshield for the rest of the fitting.
Then I used the firewall as a guide to draw a trim line on the Lexan. I trimmed it to that line and sanded from there to get it to fit in place without stress leaving a 1/16th to 1/8th inch gap. This is a curve and takes some time to get it right. Then beginning in the middle, I carefully drilled and cleco'd the front of the windshield in place working side to side.
The next part takes some strength as the sides have to forcefully bend into the channels on each side. First, you have to bend them down and clamp them to determine your trim line, otherwise they won't fit. Once trimmed, you can bend them and push the inside and behind the aluminum channels that were fit initially. Once happy with the fit you can cleco them in place. Then on to the rear upper part of the door opening. Same procedure, clamp in place and then trim. Re-clamp in place and drill for cleco's. Repeat for the other side.
Next up will be fitting the door trim pieces and figuring out what fasteners to use to finish up with the install.


