Tuesday, September 24, 2019

MOD - Trim Servo

Back to the trim servo. I've been putting this task off for awhile. I had a guy that was making carbon fiber trim servo covers, and he was supposed to make me one. Long story short, he didn't. So, I have to make one myself, not carbon fiber but fiberglass.

This is my first attempt at making the mold for it. I had some four inch thick blue foam left over from another long ago project. I cut out what looked to the appropriate size chunk and started whittling and sanding. This is what I have so far...
This will eventually look something like this...
And will attach to the servo something like this...


Sunday, September 22, 2019

MOD - Landing Lights

I set out to tackle the landing light installation. Since the SuperSTOL doesn't have an OEM solution to landing lights, I had to adapt my own.

My first idea was to mount the AeroLED MicroSun bracket to the underside of the leading edge skin in a similar fashion as Trent did on his Kitfox.
Trent Palmer's Kitfox
This would require riveting and Hysoling a plate doubler in to provide a more secure mount for the bracket. After thinking about this option for a few days, I realized that the LED's would sit high and close to the skin but would be partially blocked when the slats were deployed. Although this mounting would provide a reasonably aerodynamic solution it wouldn't work in my application because of the slats. So, decided to go in a different direction.

I decided on trying to mount them to the wing struts in a similar fashion as Paul did on his SuperSTOL XL.
Paul Zimmerman's SuperSTOL XL
However this position presents several problems. First, it definitely creates more drag. Second the airfoil shape of the struts creates mounting issues. Third, the struts angle backwards toward the fuselage creating an aiming problem. The good news is that the slats would not affect them.

I started by cutting some .020" aluminum strips that I hand formed around the strut.
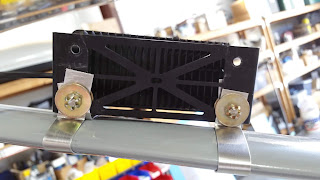
I then made some bends in the ends to create tabs. Then using the AN970-3 large washers, I drilled bolt holes in the tabs.

Initially, I wanted to mount the LED's level with the wings. I could not think of a way to do so that was easy or didn't involve designing a 3D part and using a CNC to cut it out. My first attempts were not functional.
 
So, I quickly abandoned that idea. Once I attached the LED bracket and the light, I realized the .020" aluminum I used was too thin and flimsy.
Small pile of rejects
So, I moved up to .032" aluminum. This proved to be stiff enough while still allowing hand forming. I then began trying to make the brackets equal in shape.
Once I attached the bracket and the LED the aiming issue came to light. The solution was to staggering the tabs on the brackets (one towards the front of the strut, the other toward the back) which canted the LED bracket thereby adjusting the aiming point of the LED in a more forward position.
After several attempts I finally ended up with brackets that mirror each other, are strong and hold the LED's in the correct position to clear the slats and aim at the correct point forward.
More rejects


Monday, September 2, 2019

Replacement Left Aileron

I started building the replacement left aileron today. This replaces the aileron that I built at the factory, now going on two years ago. It was the first thing I built for the kit. I had factory supervision and in their haste to show me how it was to be done, they installed the brackets on the spar incorrectly. Unfortunately, it wasn't noticed until the aileron was finished and it required a complete tear down of the aileron.

In Just Aircraft's defense, they stepped up and had one of their guys rebuild it for me so I could move on to the next project. I had very limited time to spend at the factory and wanted to get as much done as I could. The good news was that they fixed the aileron, the bad news was it was warped. I did not notice this until I got home and started the inventory. Again, they stepped up and sent me a complete set of parts to build a new aileron. I just now have gotten around to building it.

So, the first task was to pull all the parts out and select the spar and the three brackets that need to be attached to it. Because there is a Left and Right Aileron, I had to verify the correct orientation of the brackets before installing them. I cleco'd them in place and match drilled the rivet holes, then deburred them and scuffed the mating surfaces for the Hysol. I mixed up a batch of Hysol, applied it and cleco'd the brackets in place. I then riveted the brackets in place making sure I inserted the rivets from the correct side. Once the three brackets were riveted, I cleaned up the excess Hysol from around the rivets and the brackets. I let that set up for several hours.

Next, I began clecoing the ribs in place. There is an orientation to them that must be followed. There are twelve braces that have to be installed at the rear rib junction with the spar. I cleco'd them in place. That was a good break point for the day.